


Learning how to take a screenshot on a Chromebook is convenient and simple. Knowing how to accomplish this might be useful whether you want to share a screen with friends, save a crucial document, or take a cool picture. Chromebooks, which are renowned for their ease of use and productivity, provide a number of simple ways to capture screenshots. Depending on what you require, you may either capture the entire screen or only a portion of it.
You can quickly learn how to snap a screenshot on your Chromebook by following these instructions. We'll also discuss where to store and save your screenshots once you've taken them. This article will teach you how to take screenshots quickly.
The Step-By-Step Guide To Take Screenshots On Chromebook
Taking a screenshot on a Chromebook might be a bit challenging at first, especially if you're coming from a Mac or Windows. But once you get used to it, capturing your screen is actually pretty easy. On a Chromebook, you can take screenshots in two main ways.
Method 1: Using Keyboard Shortcuts
This method is fast and effective, so it's perfect for people who would rather use keyboard commands. We will dissect how to take screenshots of the entire screen or only a portion of it.
A. Full-Screen Screenshot
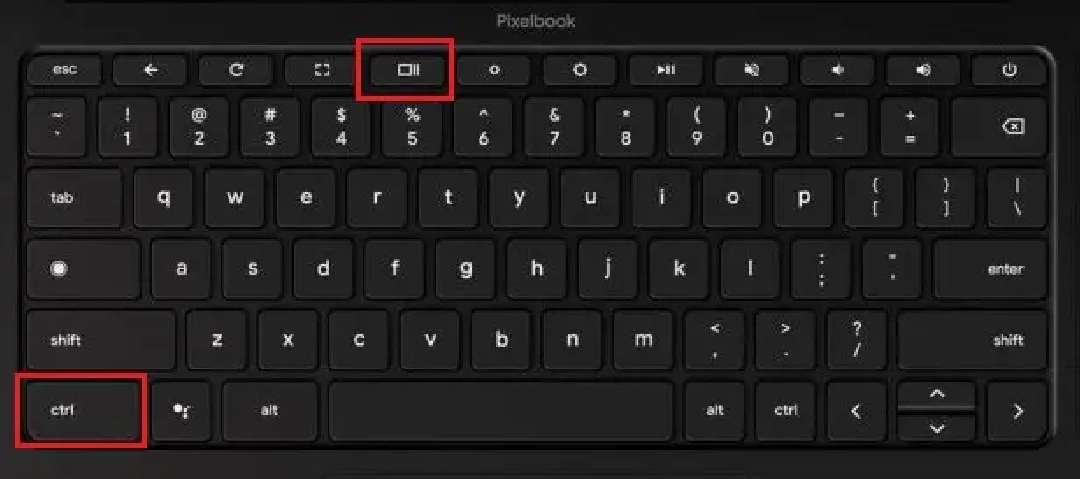
Step 1: Press the Ctrl + Show Windows Keys
On the keyboard of your Chromebook, find the “Show” Windows key. It appears as an icon that looks like a rectangle with two lines on the right side and is often located in the top row. This is a Chromebook-specific key. Simultaneously press the "Ctrl" key with the "Show" Windows Keys. This instructs your Chromebook to take a screenshot of the whole screen that is visible.
Step 2: Check Your Notification Area
Upon pressing these keys, immediately glance to the lower right corner of your screen. You should see a notification pop-up indicating that your screenshot has been successfully captured and saved. Also, this notification gives you a fast way to see your screenshot in the “Files app”. It makes finding and opening your screenshot super easy.
B. Partial Screen Screenshot

Step 1: Press Ctrl + Shift + Show Windows Keys
You'll need to add the “Shift” key to the combination if you want to record a specific portion of your screen. Thus, simultaneously press the “Ctrl, Shift, and Show Windows” key. By pressing these keys, you may pick the precise region of your screen that you wish to record by turning your mouse into a crosshair.
Step 2: Click and Drag the Crosshair
To highlight the area you want to record, move the crosshair pointer across the screen while holding down the mouse or trackpad button. The area you're selecting will have a darkened overlay over it to let you see what your snapshot will look like.
After you've made your selection, let go of the mouse or trackpad button. This action takes a snapshot of the region that is chosen.
Step 3: Look for the Notification
In the lower right corner of your screen, a pop-up will appear, just as when you take a full-screen snapshot. This alert verifies that you have captured and stored a partial screenshot. A quick link to the screenshot in the “Files app” is also included in the notification.
Method 2: Accessing Quick Settings:
If you want to take a screenshot on Chromebook of a specific part of your screen, you can use the Quick Settings pop-up. It's a simple and flexible way to do it. For people who would rather utilize a visual interface than keyboard shortcuts, this technique is really helpful.

Here's a detailed breakdown of how to use this method:
- Open the Quick Settings Panel: To start, click the “time” that is visible in the lower right corner of your screen. This will open the “Quick Settings panel”.
- Find the Icon for Screen Capture: Look inside the “Quick Settings panel” for an icon that looks like a camera or a video camera. Depending on which Chrome OS version you're using, this symbol might appear different. But usually, it's a sign that you can take a screenshot or record your screen.
- Select Capture Mode: When you click the “Screen capture icon”, a menu with options for taking screenshots and recording will pop up. Here, you have the choice between taking a screenshot and recording your screen. For screenshots, further options allow you to decide how you want to capture your screen: full screen, partial screen, or a specific window.
Taking a Screenshot:
Full-Screen Capture:
To take a picture of everything on your screen, click the camera icon in the toolbar. After you do that, taking a screenshot on Chromebook is simple
Partial Screen Capture:
Click the partial screen button only to capture a portion of your screen. Typically, this button is represented by an icon that resembles a rectangle or square with one corner missing. When you choose this option, a crosshair will appear where your cursor was. To capture a portion of the screen, click and drag this crosshair over the desired location. Once you release the mouse button or lift your finger from the trackpad, a picture of the area you selected will be taken.
Window Capture:
When you want to take a picture of a specific program window, choose the window capture option. It's usually shown with an icon that looks like a window. Place your mouse over the window you want to capture after choosing this option. When a window is chosen, it will become highlighted. To capture a screenshot of the window, click on it.
How To Take A Screenshot On A Chromebook Tablet?

Taking screenshots on a Chromebook Tablet is easy. You just have to follow the steps:
1. Using Keyboard
A physical keyboard might not be present on all Chrome OS tablet devices. Don't panic, though; you can take screenshots on tablets using a straightforward button combination.
Press the “Power” and “Volume Down” buttons at the same time to snap a screenshot. Your screen will then recognize the snapshot and capture an image of your whole screen.
2. Using A Stylus
- Tap the "Pen" button on your Chromebook's shelf.
- Select "Capture Region" from the drop-down menu.
- With the stylus, outline the section of the screen you want to capture.
- To take the screenshot, release the stylus from the screen.
ALSO READ: How To Record Screen On Windows
Where screenshots are saved on a Chromebook?
Where is the result? A snapshot of the screencast you take may be accessed immediately from the Clipboard. The last five items you've saved to it are kept there. To see the options, simply hit “Search + V”.
Recent screenshots are also available in a storage area known as Tote. Click the “Tote” button on the shelf to open it.
You can find screenshots in your files that were previously deleted from the Clipboard. To find your screenshots, just open the “Files app” on your Chromebook. You'll see them in either the Videos or Images folder.
Third-Party Alternatives To Taking A Screenshot On Chromebook
The screenshot shortcuts in Chrome OS might seem basic and not very exciting. But don't worry! There are lots of other Android apps for Chromebook and extensions that can do more cool stuff. Here are some easy tools for taking a screenshot on Chromebook.
1. Awesome Screenshot
With the robust Chrome plugin Awesome Screenshot, you can take multiple screenshots of your screen. You can take screenshots of the full website or a specific section. You may also add text, arrows, and objects to annotate your screenshots. Additionally, sharing your pictures with others is a breeze. It's excellent for those who must provide feedback or a visual explanation of something.
2. Nimbus Capture
There are several possibilities for taking screenshots and recording displays using Nimbus Capture. A delayed screenshot, a portion of the screen, or the entire screen can all be taken. Also, it lets you edit your screenshots. You can add text, arrows, and other stuff before you share or save them. Using Nimbus Capture to create lessons or presentations is an excellent idea.
3. Lightshot
Lightshot is a straightforward yet useful tool for taking fast screenshots. It's renowned for being user-friendly. Simply click the snapshot button after installation, choose the region you wish to capture, and you're done. After that, you may submit or update your snapshot to obtain a URL that can be shared. If you're seeking a simple and quick tool to take screenshots, Lightshot is perfect.
4. FireShot
Another Chrome addon that allows you to quickly record web pages is known as FireShot. Screenshots of the full page or only the viewable areas are also possible. After you take a screenshot, FireShot lets you change it and save it in different types of files like PNG, JPG, and PDF. It could be useful for folks who want to save and share web pages, whether for work or personal stuff.
5. Screencastify
Screencastify can take screenshots and is a screen recording tool. With the ability to record audio and webcam footage, it's ideal for making screen capture videos. This makes it great for sharing your screen with others or for things like presentations. Screencastify saves screenshots and videos right away. They go straight to Google Drive, so it's easy to share and find them later.
6. Flamory
With a twist, Flamory is more focused on bookmarking web sites than other similar apps. It saves a screenshot of the website you are bookmarking so you can refer to it visually. When conducting research or gathering references for a project, this is especially helpful. You may retain the visual content of the pages you find interesting in addition to the link thanks to Flamory.
Summing Up
Now you've learned how to screenshot on Chromebook. It's easy and there are several options. Taking a picture of your screen is easy. You can do it by pressing some keys on your keyboard to capture everything on your screen or just part of it. You can also use Quick Settings for more options. They make taking screenshots better by letting you do things like edit and share them.
Remember that a screenshot is automatically stored, so you may locate it, share it, or save it for later. If you want to capture something on your Chromebook, whether it's for work, school, or just to save something cool, here's the guide. So grab your Chromebook and start taking notes about the things that are important to you!
We've got some easy ways to learn screenshot on a Chromebook. It depends on what you want to capture. We hope these tips will help anyone who wants to learn how to use a Chromebook for taking screenshots.
Frequently Asked Questions
-
How do I take a full-screen screenshot on a Chromebook?

Press the “Ctrl + Show Windows” keys together. A notification will pop up, telling you the screenshot is saved in your Downloads folder.
-
Can I capture just part of the screen on my Chromebook?
-
Can I use an app to take screenshots on a Chromebook?
-
How to Screenshot on Chromebook HP?
-
How to Screenshot on Lenovo Chromebook?
-
How to Screenshot on Dell Chromebook?

By Manish

Content Strategist at MobileAppDaily
With a mixture of literature, cinema, and photography, Manish is mostly traveling. When he is not, he is probably writing another tech news for you!


